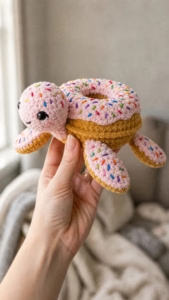
Sprinkles is a sea turtle with a shell that looks like a frosted sprinkle donut. This free amigurumi pattern makes a whimsical, huggable toy that works as a gift or a display piece.

About This Crochet Pattern
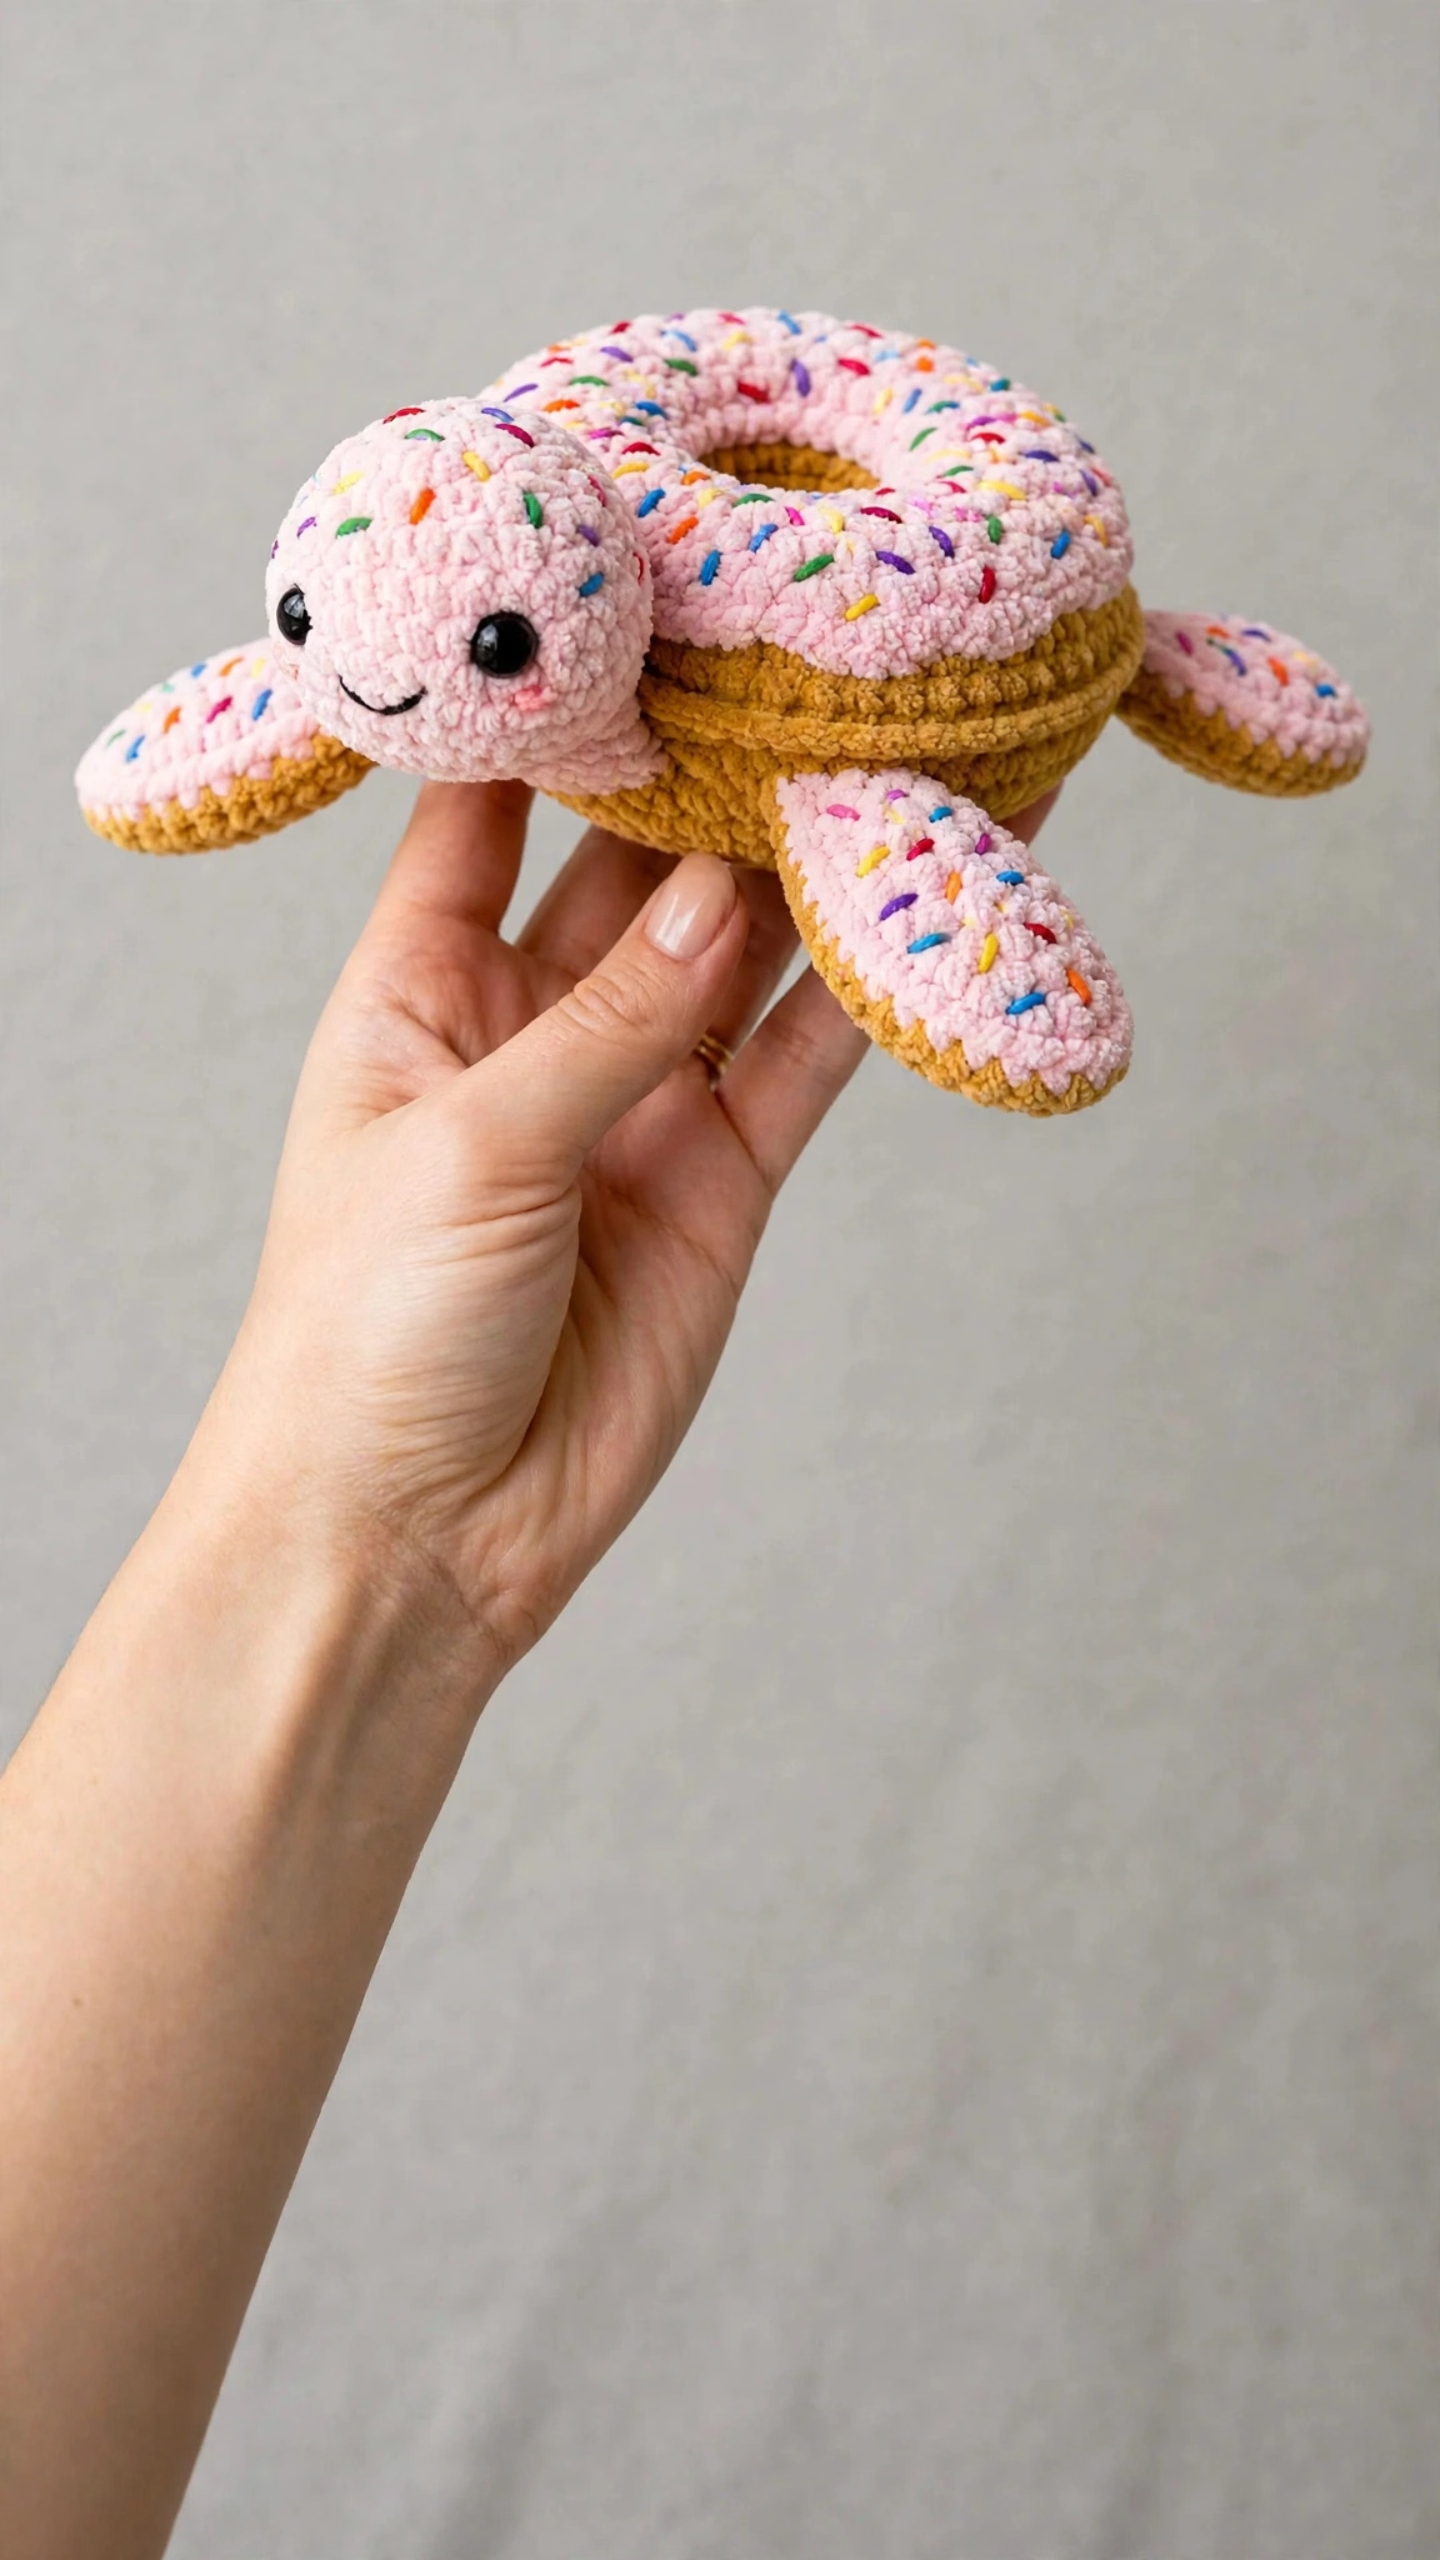
Sprinkles is a sea turtle with a true torus shell, a pink frosted top, and a golden dough colored underside. The body, head, and four flippers are worked separately and then assembled, and the colorful sprinkles are embroidered at the end with simple straight stitches.
The finished amigurumi measures about 8 inches wide from flipper to flipper, 5 inches long from nose to tail, and 3.5 inches tall when sitting. It is a playful project that looks like a donut shop treat and a friendly sea turtle at the same time.
Jump To
- 1. About This Crochet Pattern
- 2. Skill Level
- 3. Time Estimate
- 4. Materials You Will Need
- 5. Gauge
- 6. Abbreviations (US Terms)
- 7. Pattern Notes
- 8. Donut Shell Top (Color B)
- 9. Donut Shell Bottom (Color A)
- 10. Joining the Shell Top and Bottom
- 11. Head (Color B)
- 12. Neck (Color B, Continuing From Head)
- 13. Front Flippers (Make 2)
- 14. Back Flippers (Make 2)
- 15. Tail (Color B)
- 16. Assembly Instructions
- 17. Size Customization Tips
- 18. Care Instructions
- 19. FAQs
- 20. Final Thoughts on This Donut Turtle Crochet Pattern
- 21. Rainbow Sprinkle Donut Turtle
Skill Level
This Sprinkle Donut Turtle pattern is rated intermediate. You should be comfortable working in the round, making invisible decreases, joining separate pieces, and doing basic embroidery.
The donut shell uses two flat rings joined together, so it asks for some attention to detail. If you have completed at least two earlier amigurumi projects, you will manage this comfortably, and the checkpoints for the shell construction help you confirm each stage.
Time Estimate
Plan for 6 to 10 hours if you are an experienced crocheter. Allow additional time for embroidering the sprinkles and for final assembly.
The sprinkles alone can take an hour or more depending on how generously you cover the turtle.
Materials You Will Need
You will need two main shell colors, six small sprinkle colors, one main hook, and a few basic tools. The yarn, hook, and supply details below explain how each choice changes the finished toy.
Yarn
Color A is the donut dough in golden yellow, and you need approximately 80 yards (73 m) of bulky weight chenille or velvet yarn. Color B is the strawberry frosting in light pink, and you need approximately 100 yards (91 m) of bulky weight chenille or velvet yarn.
Colors C through H are small scraps of worsted or bulky weight yarn in red, orange, yellow, green, blue, and purple. You only need approximately 1 yard of each color.
Recommended Yarn Brands
Option 1 is Bernat Blanket Yarn in Peaches N Cream for Color A and Baby Pink for Color B. This is a super bulky option, so use a US size M (9 mm) hook and expect a finished turtle approximately 10 to 11 inches wide.
Option 2 is Lion Brand Pound of Love in Mustard for Color A and Pastel Pink for Color B. This worsted weight option uses a US size J (6 mm) hook and gives a finished size of approximately 6 to 7 inches wide.
Option 3 is Paintbox Yarns Simply Chunky in Mustard Yellow for Color A and Blush Pink for Color B. It closely matches the texture and drape in the reference photos, and you use the K hook as written for the stated gauge and finished size.
Chenille or velvet yarn gives a dense, velvety pile. Standard smooth yarn will work, but it will not give the same soft texture. Whatever yarn you choose, crochet tightly enough that stuffing does not show through the stitches.
Hook
The main hook is a US size K (6.5 mm) for the main pieces. A US size I (5.5 mm) hook is optional for tighter tension on small pieces.
Other Supplies
You also need two 12 mm black safety eyes, polyester fiberfill stuffing, a tapestry needle for assembly and embroidery, stitch markers, and scissors. Keep the stitch markers handy because they make continuous rounds easier to track.
Gauge
The gauge is 10 single crochet by 10 rows equals 4 inches (10 cm), worked in continuous rounds with Color B on a US K (6.5 mm) hook. Gauge matters for the finished dimensions, so adjust your hook size up or down as needed.
Swatching is recommended before you begin the shell pieces. A quick swatch saves time later and helps the shell rings match the planned sizes.
Abbreviations (US Terms)
The pattern uses US terms. Here are the abbreviations and the working definitions you will use most often.
| Abbreviation | Meaning |
|---|---|
| ch | chain |
| sl st | slip stitch |
| sc | single crochet |
| inc | work 2 single crochet stitches into the same stitch |
| dec | invisible single crochet decrease: insert the hook through the front loop only of the next stitch, then through the front loop only of the following stitch, yarn over and pull through the first two loops, then yarn over and pull through the remaining two loops |
| BLO | back loop only |
| FLO | front loop only |
| MR | magic ring |
| st(s) | stitch or stitches |
| pm | place marker |
| rep | repeat |
| rnd | round |
| RS | right side facing |
| WS | wrong side facing |
Pattern Notes
All pieces are worked in continuous rounds unless otherwise noted. Do not join rounds with a slip stitch unless instructed, and place a stitch marker in the first stitch of each round and move it up as you work.
The donut shell is made from two flat rings, a top frosted ring in Color B and a bottom dough ring in Color A, joined and stuffed to create the torus shape. The head and neck are one continuous piece, and the four flippers are worked flat into rounded paddle shapes.
Flippers are attached to the body base before closing, and the head is attached at the front opening of the shell. Safety eyes are inserted before the head is closed and stuffed.
The center hole of the donut shell is intentional and is not sewn closed. For a child under three years old, replace safety eyes with embroidered eyes using black yarn.
Donut Shell Top (Color B)
The frosted top ring in Color B is a flat circle with a center hole. Work the rounds in order, then check the ring size before you move on.
- Rnd 1: MR, ch 1, 6 sc into ring, pull ring closed. (6 sc)
- Rnd 2: Inc in each st around. (12 sc)
- Rnd 3: (Sc 1, inc) rep 6 times. (18 sc)
- Rnd 4: (Sc 2, inc) rep 6 times. (24 sc)
- Rnd 5: (Sc 3, inc) rep 6 times. (30 sc)
- Rnd 6: (Sc 4, inc) rep 6 times. (36 sc)
- Rnd 7: Working in BLO only, sc in each st around. (36 sc)
- Rnd 8: Sc in each st around. (36 sc)
- Rnd 9: Sc in each st around. (36 sc)
- Rnd 10: Working in FLO of Rnd 6 (the unworked front loops left from Rnd 7), join Color B and sc in each of the 36 front loops. (36 sc)
- Rnd 11: (Sc 5, inc) rep 6 times. (42 sc)
- Rnd 12: (Sc 6, inc) rep 6 times. (48 sc)
- Rnd 13: (Sc 7, inc) rep 6 times. (54 sc)
- Rnd 14: (Sc 8, inc) rep 6 times. (60 sc)
- Rnd 15: (Sc 9, inc) rep 6 times. (66 sc)
- Rnd 16: (Sc 10, inc) rep 6 times. (72 sc)
- Fasten off, leaving a long tail of approximately 18 inches for seaming.
Checkpoint: The piece should be a flat ring with an open center hole of approximately 1.5 inches in diameter and an outer diameter of approximately 6 inches.
Donut Shell Bottom (Color A)
The dough colored underside and outer rim in Color A follow the same round structure as the top through Rnd 16. Then you add the outer rim in Rnds 17 through 19. Do not fasten off, because the shell pieces are joined next.
- Rnd 1: MR, ch 1, 6 sc into ring, pull ring closed. (6 sc)
- Rnd 2: Inc in each st around. (12 sc)
- Rnd 3: (Sc 1, inc) rep 6 times. (18 sc)
- Rnd 4: (Sc 2, inc) rep 6 times. (24 sc)
- Rnd 5: (Sc 3, inc) rep 6 times. (30 sc)
- Rnd 6: (Sc 4, inc) rep 6 times. (36 sc)
- Rnd 7: Working in BLO only, sc in each st around. (36 sc)
- Rnd 8: Sc in each st around. (36 sc)
- Rnd 9: Sc in each st around. (36 sc)
- Rnd 10: Working in FLO of Rnd 6, join Color A and sc in each of the 36 front loops. (36 sc)
- Rnd 11: (Sc 5, inc) rep 6 times. (42 sc)
- Rnd 12: (Sc 6, inc) rep 6 times. (48 sc)
- Rnd 13: (Sc 7, inc) rep 6 times. (54 sc)
- Rnd 14: (Sc 8, inc) rep 6 times. (60 sc)
- Rnd 15: (Sc 9, inc) rep 6 times. (66 sc)
- Rnd 16: (Sc 10, inc) rep 6 times. (72 sc)
- Rnd 17: Working in BLO only, sc in each st around. (72 sc)
- Rnd 18: Sc in each st around. (72 sc)
- Rnd 19: Sc in each st around. (72 sc)
- Do not fasten off. You will join the shell pieces next.
Joining the Shell Top and Bottom
Hold the top and bottom with wrong sides facing each other, inner walls facing inward, flat surfaces facing outward, and both outer edges at 72 stitches. Begin stuffing generously with fiberfill before closing completely. Push stuffing firmly into the torus shape to fill the rounded tube evenly around the ring, and leave the center hole clear.
- Hold the donut shell top (Color B) and donut shell bottom (Color A) with wrong sides facing each other. The inner walls of both pieces should face inward and the flat surfaces should face outward. Both outer edges are at 72 stitches.
- Begin stuffing the donut generously with fiberfill before closing completely. Push stuffing firmly into the torus shape, filling the rounded tube evenly all the way around the ring. Leave the center hole clear.
- Join round: Insert hook through the corresponding stitch on the top piece and the current stitch on the bottom piece simultaneously, sc through both layers. Continue around, sc through both layers in each paired stitch. (72 sc joining round)
- Fasten off and weave in ends.
Checkpoint: The joined shell should be approximately 7 inches in outer diameter, with a 1.5 inch inner hole diameter and approximately 2 inches thick.
Head (Color B)
The head is worked in Color B. Insert the safety eyes before the head is closed and stuffed, and do not close the last round completely because the neck continues from the head.
- Rnd 1: MR, ch 1, 6 sc into ring. (6 sc)
- Rnd 2: Inc in each st around. (12 sc)
- Rnd 3: (Sc 1, inc) rep 6 times. (18 sc)
- Rnd 4: (Sc 2, inc) rep 6 times. (24 sc)
- Rnd 5: Sc in each st around. (24 sc)
- Rnd 6: Sc in each st around. (24 sc)
- Insert safety eyes between Rnds 3 and 4, spaced approximately 8 stitches apart. Secure backings firmly.
- Rnd 7: Sc in each st around. (24 sc)
- Rnd 8: (Sc 2, dec) rep 6 times. (18 sc)
- Begin stuffing head firmly.
- Rnd 9: (Sc 1, dec) rep 6 times. (12 sc)
- Rnd 10: Dec 6 times. (6 sc)
- Do not close completely. Continue working the neck.
Neck (Color B, Continuing From Head)
Continue from the head in Color B. The neck widens slightly at the base so it can attach to the shell.
- Rnd 11: Sc in each st around. (6 sc)
- Rnd 12: (Sc 1, inc) rep 3 times. (9 sc)
- Rnd 13: Sc in each st around. (9 sc)
- Rnd 14: (Sc 2, inc) rep 3 times. (12 sc)
- Rnd 15: Sc in each st around. (12 sc)
- Fasten off, leaving a long tail for attaching to shell.
Checkpoint: The head piece should be approximately 1.75 inches wide, and the neck should be approximately 1 inch wide at the base.
Front Flippers (Make 2)
The front flippers are flat pieces worked in rows, with a Color B top and a Color A bottom joined around the perimeter. Make 2 front flippers total.
Flipper Top (Color B)
- Flipper Top (Color B): Ch 4.
- Row 1: Sc in 2nd ch from hook, sc in next 2 ch, turn. (3 sc)
- Row 2: Ch 1, inc in first st, sc 1, inc in last st, turn. (5 sc)
- Row 3: Ch 1, inc in first st, sc 3, inc in last st, turn. (7 sc)
- Row 4: Ch 1, inc in first st, sc 5, inc in last st, turn. (9 sc)
- Row 5: Ch 1, sc in each st across, turn. (9 sc)
- Row 6: Ch 1, sc in each st across, turn. (9 sc)
- Row 7: Ch 1, dec, sc 5, dec, turn. (7 sc)
- Row 8: Ch 1, dec, sc 3, dec, turn. (5 sc)
- Row 9: Ch 1, dec, sc 1, dec, turn. (3 sc)
- Row 10: Ch 1, sc 3. (3 sc)
- Fasten off.
Flipper Bottom (Color A)
Repeat all rows as for the front flipper top, in Color A.
Flipper Assembly
Hold one Color B top and one Color A bottom with wrong sides together. Using Color A and a tapestry needle or crochet hook, slip stitch around the perimeter through both layers. Enclose a thin layer of fiberfill for light padding, not full stuffing. Fasten off and weave in ends. Make 2 front flippers total.
Checkpoint: Each front flipper should measure approximately 2.5 inches long by 1.5 inches wide at the widest point.
Back Flippers (Make 2)
The back flippers are smaller and more rounded than the front flippers, with a Color B top and a Color A bottom. Make 2 back flippers total.
Flipper Top (Color B)
- Flipper Top (Color B): Ch 3.
- Row 1: Sc in 2nd ch from hook, sc in next ch, turn. (2 sc)
- Row 2: Ch 1, inc in each st across, turn. (4 sc)
- Row 3: Ch 1, inc in first st, sc 2, inc in last st, turn. (6 sc)
- Row 4: Ch 1, sc in each st across, turn. (6 sc)
- Row 5: Ch 1, dec, sc 2, dec, turn. (4 sc)
- Row 6: Ch 1, dec, dec. (2 sc)
- Fasten off.
Flipper Bottom (Color A)
Repeat all rows as for the back flipper top, in Color A.
Flipper Assembly
Use the same assembly method as for the front flippers. Make 2 back flippers total.
Tail (Color B)
- Rnd 1: MR, ch 1, 4 sc into ring. (4 sc)
- Rnd 2: Inc in each st around. (8 sc)
- Rnd 3: Sc in each st around. (8 sc)
- Rnd 4: (Sc 1, dec) rep 2 times, sc 2. (6 sc)
- Rnd 5: Sc in each st around. (6 sc)
- Stuff lightly. Fasten off, leaving a tail for attachment.
Assembly Instructions
- Step 1: Identify the front of the donut shell where the head will emerge. Using the long tail on the neck, sew the base of the neck firmly to the underside of the front of the shell ring. The head should angle upward and forward, giving the appearance that the turtle is peeking out from under the donut shell.
- Step 2: Attach the front flippers to the left and right sides of the shell underside, angling slightly forward. Position them at approximately the 10 o clock and 2 o clock positions relative to the head.
- Step 3: Attach the back flippers to the lower left and right of the shell underside at approximately the 7 o clock and 5 o clock positions. Angle them slightly backward and outward.
- Step 4: Attach the tail at the 6 o clock position on the shell underside, centered at the back.
- Step 5: Embroider a small curved smile below the safety eyes using light pink or dark pink yarn. Create a gentle upward curve using three or four small stitches.
- Step 6: Embroider the sprinkles. Thread your tapestry needle with 1 inch lengths of red, orange, yellow, green, blue, and purple yarn. Place sprinkles randomly across the entire top surface of the shell, across the top of the head, and across the top of all four flippers. Each sprinkle is one short diagonal straight stitch approximately 3 to 4 mm long. Aim for 30 to 40 sprinkles on the shell and 3 to 5 per flipper and the head.
Independent donut turtle guidance also describes sprinkle embroidery as simple straight stitches in different directions using a variety of bright contrast colors, which matches the short diagonal straight stitches used here. You can see that independent donut turtle amigurumi pattern for another take on the same idea.
Size Customization Tips
For a smaller turtle, substitute worsted weight yarn with a US size G (4 mm) or H (5 mm) hook. The finished toy will be approximately 5 to 6 inches wide.
For a larger turtle, use super bulky weight yarn with a US size N (9 mm) or P (10 mm) hook. That gives approximately 12 to 14 inches wide.
You can also add additional increase rounds to the shell top and bottom before the joining round to increase the outer diameter without affecting the hole size.
Care Instructions
Hand wash in cool water with a small amount of mild soap. Gently squeeze out excess water without wringing, then reshape and air dry flat away from direct sunlight or heat sources.
Do not machine wash or tumble dry chenille or velvet yarn pieces, because agitation will cause pilling and distortion.
This toy is intended for ages three and up due to the safety eye embellishments. Independent turtle guides agree that safety eyes are not recommended for children under three, and embroidered eyes in black yarn are the safer choice for babies and very young children.
FAQs
How do you crochet a sprinkle donut turtle?
To crochet a sprinkle donut turtle, work the donut shell as two flat rings in continuous rounds, a pink frosted top and a golden dough bottom, then join them with single crochet while stuffing to form a torus. Crochet the head, neck, four flippers, and tail separately, assemble them onto the shell, and finish by embroidering colorful sprinkles with short straight stitches.
What yarn is best for a donut turtle amigurumi?
Bulky weight chenille or velvet yarn is best for a soft, huggable finish, with about 80 yards of golden yellow for the dough and 100 yards of light pink for the frosting. Paintbox Yarns Simply Chunky in Mustard Yellow and Blush Pink closely matches the reference photos when used with a US K (6.5 mm) hook. Crochet tightly enough that the stuffing does not show through.
How long does it take to crochet a donut turtle?
An experienced crocheter should plan for 6 to 10 hours to complete the sprinkle donut turtle. Allow additional time for embroidering the sprinkles and final assembly, since the sprinkles alone can take an hour or more depending on how generously you cover the turtle.
Can beginners make a sprinkle donut turtle?
The pattern is rated intermediate, so it is best suited for crocheters who have completed at least two amigurumi projects. You should be comfortable working in the round, making invisible decreases, joining separate pieces, and doing basic embroidery. Step-by-step checkpoints for the shell construction help make the project manageable.
Final Thoughts on This Donut Turtle Crochet Pattern
Making Sprinkles brings smiles at every stage, from watching the donut shell take shape to adding the final colorful sprinkles. The finished turtle is an unforgettable gift for donut lovers, turtle enthusiasts, or anyone who appreciates a playful plush.
If you enjoy soft toys, browse more free crochet patterns for your next project.
Print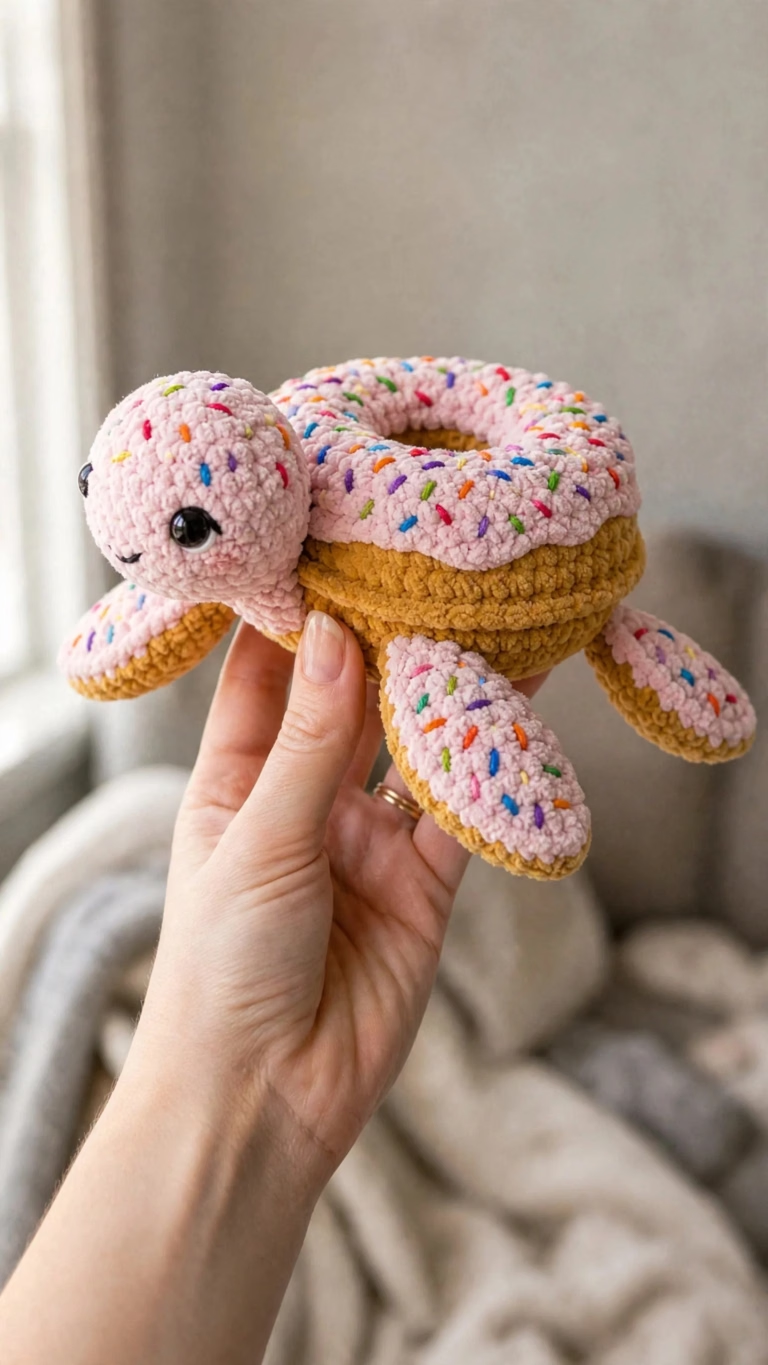
Rainbow Sprinkle Donut Turtle
Sprinkles is a sea turtle with a shell that looks like a frosted sprinkle donut. This free amigurumi pattern makes a whimsical, huggable toy that works as a gift or a display piece.
- Yield: 1 finished turtle 1x
Ingredients
Yarn
80 yards (73 m) Color A (Donut Dough / Golden Yellow) bulky weight chenille or velvet yarn
100 yards (91 m) Color B (Strawberry Frosting / Light Pink) bulky weight chenille or velvet yarn
1 yard Colors C through H (Sprinkles) worsted or bulky weight yarn in red, orange, yellow, green, blue, and purple
Recommended Yarn Brands
Option 1: Bernat Blanket Yarn in “Peaches N Cream” for Color A and “Baby Pink” for Color B, super bulky option, adjust hook to US size M (9 mm), expect finished size approximately 10 to 11 inches wide
Option 2: Lion Brand Pound of Love in “Mustard” for Color A and “Pastel Pink” for Color B, worsted weight yarn, use US size J (6 mm) hook, expect finished size approximately 6 to 7 inches wide
Option 3: Paintbox Yarns Simply Chunky in “Mustard Yellow” for Color A and “Blush Pink” for Color B, use the K hook as written for the stated gauge and finished size
Hook
1 US size K (6.5 mm) crochet hook, for main pieces
1 US size I (5.5 mm) crochet hook, optional for tighter tension on small pieces
Other Supplies
2 12 mm black safety eyes
Polyester fiberfill stuffing
1 Tapestry needle, for assembly and embroidery
Stitch markers
1 Scissors
Instructions
Donut Shell Top (Color B)
1-Rnd 1: Rnd 1: MR, ch 1, 6 sc into ring, pull ring closed. (6 sc)
2-Rnd 2: Rnd 2: Inc in each st around. (12 sc)
3-Rnd 3: Rnd 3: (Sc 1, inc) rep 6 times. (18 sc)
4-Rnd 4: Rnd 4: (Sc 2, inc) rep 6 times. (24 sc)
5-Rnd 5: Rnd 5: (Sc 3, inc) rep 6 times. (30 sc)
6-Rnd 6: Rnd 6: (Sc 4, inc) rep 6 times. (36 sc)
7-Rnd 7: Rnd 7: Working in BLO only, sc in each st around. (36 sc)
8-Rnd 8: Rnd 8: Sc in each st around. (36 sc)
9-Rnd 9: Rnd 9: Sc in each st around. (36 sc)
10-Rnd 10: Rnd 10: Working in FLO of Rnd 6 (the unworked front loops left from Rnd 7), join Color B and sc in each of the 36 front loops. (36 sc)
11-Rnd 11: Rnd 11: (Sc 5, inc) rep 6 times. (42 sc)
12-Rnd 12: Rnd 12: (Sc 6, inc) rep 6 times. (48 sc)
13-Rnd 13: Rnd 13: (Sc 7, inc) rep 6 times. (54 sc)
14-Rnd 14: Rnd 14: (Sc 8, inc) rep 6 times. (60 sc)
15-Rnd 15: Rnd 15: (Sc 9, inc) rep 6 times. (66 sc)
16-Rnd 16: Rnd 16: (Sc 10, inc) rep 6 times. (72 sc)
17-Fasten off, leaving a long tail of: Fasten off, leaving a long tail of approximately 18 inches for seaming.
Donut Shell Bottom (Color A)
18-Rnd 1: Rnd 1: MR, ch 1, 6 sc into ring, pull ring closed. (6 sc)
19-Rnd 2: Rnd 2: Inc in each st around. (12 sc)
20-Rnd 3: Rnd 3: (Sc 1, inc) rep 6 times. (18 sc)
21-Rnd 4: Rnd 4: (Sc 2, inc) rep 6 times. (24 sc)
22-Rnd 5: Rnd 5: (Sc 3, inc) rep 6 times. (30 sc)
23-Rnd 6: Rnd 6: (Sc 4, inc) rep 6 times. (36 sc)
24-Rnd 7: Rnd 7: Working in BLO only, sc in each st around. (36 sc)
25-Rnd 8: Rnd 8: Sc in each st around. (36 sc)
26-Rnd 9: Rnd 9: Sc in each st around. (36 sc)
27-Rnd 10: Rnd 10: Working in FLO of Rnd 6, join Color A and sc in each of the 36 front loops. (36 sc)
28-Rnd 11: Rnd 11: (Sc 5, inc) rep 6 times. (42 sc)
29-Rnd 12: Rnd 12: (Sc 6, inc) rep 6 times. (48 sc)
30-Rnd 13: Rnd 13: (Sc 7, inc) rep 6 times. (54 sc)
31-Rnd 14: Rnd 14: (Sc 8, inc) rep 6 times. (60 sc)
32-Rnd 15: Rnd 15: (Sc 9, inc) rep 6 times. (66 sc)
33-Rnd 16: Rnd 16: (Sc 10, inc) rep 6 times. (72 sc)
34-Rnd 17: Rnd 17: Working in BLO only, sc in each st around. (72 sc)
35-Rnd 18: Rnd 18: Sc in each st around. (72 sc)
36-Rnd 19: Rnd 19: Sc in each st around. (72 sc)
37-Do not fasten off: Do not fasten off. You will join the shell pieces next.
Joining the Shell Top and Bottom
38-Hold the donut shell top (Color B): Hold the donut shell top (Color B) and donut shell bottom (Color A) with wrong sides facing each other. The inner walls of both pieces should face inward and the flat surfaces should face outward. Both outer edges are at 72 stitches.
39-Begin stuffing the donut generously with fiberfill: Begin stuffing the donut generously with fiberfill before closing completely. Push stuffing firmly into the torus shape, filling the rounded tube evenly all the way around the ring. Leave the center hole clear.
40-Join round: Join round: Insert hook through the corresponding stitch on the top piece and the current stitch on the bottom piece simultaneously, sc through both layers. Continue around, sc through both layers in each paired stitch. (72 sc joining round)
41-Fasten off and weave in ends: Fasten off and weave in ends.
Head (Color B)
42-Rnd 1: Rnd 1: MR, ch 1, 6 sc into ring. (6 sc)
43-Rnd 2: Rnd 2: Inc in each st around. (12 sc)
44-Rnd 3: Rnd 3: (Sc 1, inc) rep 6 times. (18 sc)
45-Rnd 4: Rnd 4: (Sc 2, inc) rep 6 times. (24 sc)
46-Rnd 5: Rnd 5: Sc in each st around. (24 sc)
47-Rnd 6: Rnd 6: Sc in each st around. (24 sc)
48-Insert safety eyes between Rnds 3 and: Insert safety eyes between Rnds 3 and 4, spaced approximately 8 stitches apart. Secure backings firmly.
49-Rnd 7: Rnd 7: Sc in each st around. (24 sc)
50-Rnd 8: Rnd 8: (Sc 2, dec) rep 6 times. (18 sc)
51-Begin stuffing head firmly: Begin stuffing head firmly.
52-Rnd 9: Rnd 9: (Sc 1, dec) rep 6 times. (12 sc)
53-Rnd 10: Rnd 10: Dec 6 times. (6 sc)
54-Do not close completely: Do not close completely. Continue working the neck.
Neck (Color B, Continuing From Head)
55-Rnd 11: Rnd 11: Sc in each st around. (6 sc)
56-Rnd 12: Rnd 12: (Sc 1, inc) rep 3 times. (9 sc)
57-Rnd 13: Rnd 13: Sc in each st around. (9 sc)
58-Rnd 14: Rnd 14: (Sc 2, inc) rep 3 times. (12 sc)
59-Rnd 15: Rnd 15: Sc in each st around. (12 sc)
60-Fasten off, leaving a long tail for: Fasten off, leaving a long tail for attaching to shell.
Front Flippers (Make 2)
61-Flipper Top (Color B): Flipper Top (Color B): Ch 4.
62-Row 1: Row 1: Sc in 2nd ch from hook, sc in next 2 ch, turn. (3 sc)
63-Row 2: Row 2: Ch 1, inc in first st, sc 1, inc in last st, turn. (5 sc)
64-Row 3: Row 3: Ch 1, inc in first st, sc 3, inc in last st, turn. (7 sc)
65-Row 4: Row 4: Ch 1, inc in first st, sc 5, inc in last st, turn. (9 sc)
66-Row 5: Row 5: Ch 1, sc in each st across, turn. (9 sc)
67-Row 6: Row 6: Ch 1, sc in each st across, turn. (9 sc)
68-Row 7: Row 7: Ch 1, dec, sc 5, dec, turn. (7 sc)
69-Row 8: Row 8: Ch 1, dec, sc 3, dec, turn. (5 sc)
70-Row 9: Row 9: Ch 1, dec, sc 1, dec, turn. (3 sc)
71-Row 10: Row 10: Ch 1, sc 3. (3 sc)
72-Fasten off: Fasten off.
73-Flipper Bottom (Color A): Flipper Bottom (Color A): Repeat all rows as for flipper top.
74-Flipper Assembly: Flipper Assembly: Hold one Color B top and one Color A bottom with wrong sides together. Using Color A and a tapestry needle or crochet hook, sl st around the perimeter through both layers. Enclose a thin layer of fiberfill (just enough for light padding, not full stuffing). Fasten off and weave in ends.
75-Make 2 front flippers total: Make 2 front flippers total.
Back Flippers (Make 2)
76-Flipper Top (Color B): Flipper Top (Color B): Ch 3.
77-Row 1: Row 1: Sc in 2nd ch from hook, sc in next ch, turn. (2 sc)
78-Row 2: Row 2: Ch 1, inc in each st across, turn. (4 sc)
79-Row 3: Row 3: Ch 1, inc in first st, sc 2, inc in last st, turn. (6 sc)
80-Row 4: Row 4: Ch 1, sc in each st across, turn. (6 sc)
81-Row 5: Row 5: Ch 1, dec, sc 2, dec, turn. (4 sc)
82-Row 6: Row 6: Ch 1, dec, dec. (2 sc)
83-Fasten off: Fasten off.
84-Flipper Bottom (Color A): Flipper Bottom (Color A): Repeat all rows as for back flipper top.
85-Flipper Assembly: Flipper Assembly: Same as front flipper assembly. Make 2 back flippers total.
Tail (Color B)
86-Rnd 1: Rnd 1: MR, ch 1, 4 sc into ring. (4 sc)
87-Rnd 2: Rnd 2: Inc in each st around. (8 sc)
88-Rnd 3: Rnd 3: Sc in each st around. (8 sc)
89-Rnd 4: Rnd 4: (Sc 1, dec) rep 2 times, sc 2. (6 sc)
90-Rnd 5: Rnd 5: Sc in each st around. (6 sc)
91-Stuff lightly: Stuff lightly. Fasten off, leaving a tail for attachment.
Assembly Instructions
92-Identify the front of the donut shell: Step 1: Identify the front of the donut shell where the head will emerge. Using the long tail on the neck, sew the base of the neck firmly to the underside of the front of the shell ring. The head should angle upward and forward, giving the appearance that the turtle is peeking out from under the donut shell.
93-Attach the front flippers to the left: Step 2: Attach the front flippers to the left and right sides of the shell underside, angling slightly forward. Position them at approximately the 10 o’clock and 2 o’clock positions relative to the head.
94-Attach the back flippers to the lower: Step 3: Attach the back flippers to the lower left and right of the shell underside at approximately the 7 o’clock and 5 o’clock positions. Angle them slightly backward and outward.
95-Attach the tail at the 6 o’clock: Step 4: Attach the tail at the 6 o’clock position on the shell underside, centered at the back.
96-Embroider a small curved smile below the: Step 5: Embroider a small curved smile below the safety eyes using light pink or dark pink yarn. Create a gentle upward curve using three or four small stitches.
97-Embroider the sprinkles: Step 6: Embroider the sprinkles. Thread your tapestry needle with 1-inch lengths of red, orange, yellow, green, blue, and purple yarn. Place sprinkles randomly across the entire top surface of the shell, across the top of the head, and across the top of all four flippers. Each sprinkle is one short diagonal straight stitch approximately 3 to 4 mm long. Aim for 30 to 40 sprinkles on the shell and 3 to 5 per flipper and the head.
Last Step:
Please leave a rating and comment letting us know how you liked this recipe! This helps our business to thrive and continue providing free, high-quality recipes for you.- Method: crochet