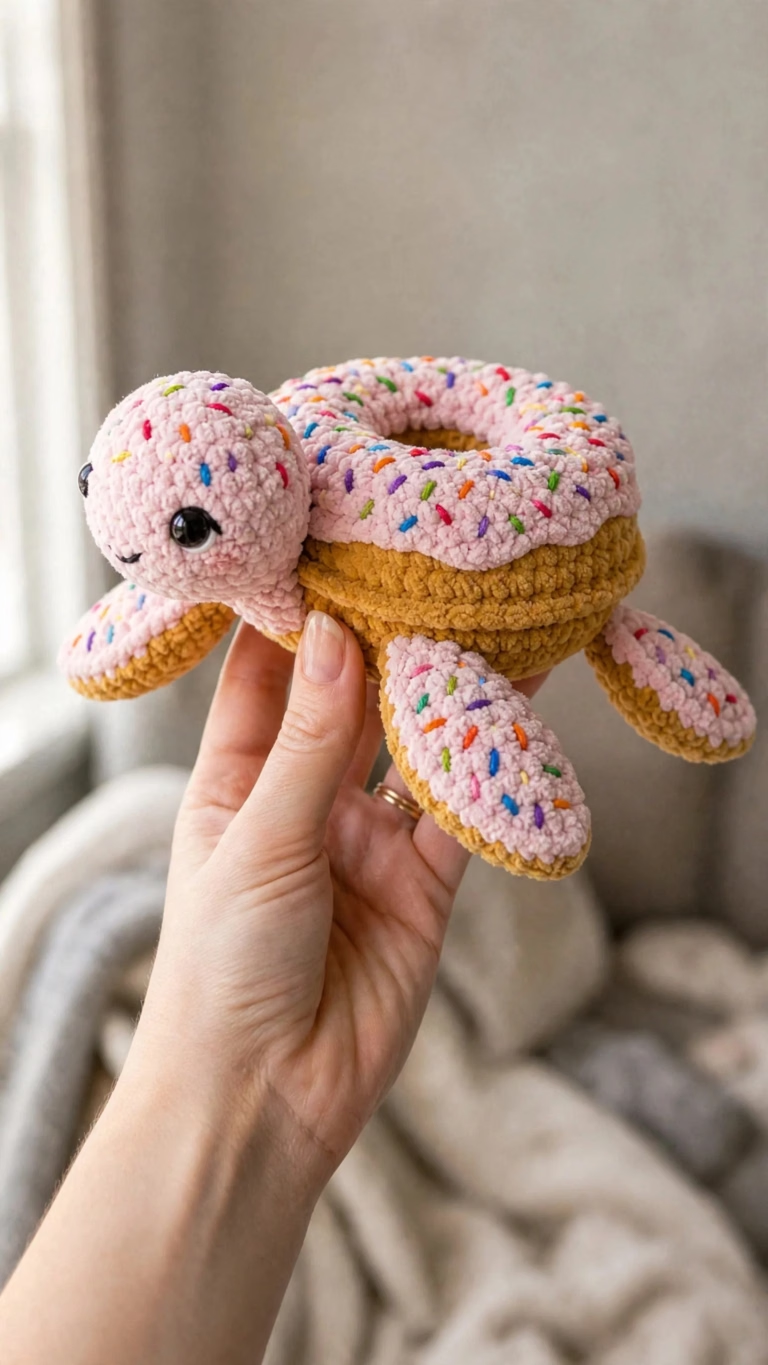
Ingredients
Yarn
80 yards (73 m) Color A (Donut Dough / Golden Yellow) bulky weight chenille or velvet yarn
100 yards (91 m) Color B (Strawberry Frosting / Light Pink) bulky weight chenille or velvet yarn
1 yard Colors C through H (Sprinkles) worsted or bulky weight yarn in red, orange, yellow, green, blue, and purple
Recommended Yarn Brands
Option 1: Bernat Blanket Yarn in “Peaches N Cream” for Color A and “Baby Pink” for Color B, super bulky option, adjust hook to US size M (9 mm), expect finished size approximately 10 to 11 inches wide
Option 2: Lion Brand Pound of Love in “Mustard” for Color A and “Pastel Pink” for Color B, worsted weight yarn, use US size J (6 mm) hook, expect finished size approximately 6 to 7 inches wide
Option 3: Paintbox Yarns Simply Chunky in “Mustard Yellow” for Color A and “Blush Pink” for Color B, use the K hook as written for the stated gauge and finished size
Hook
1 US size K (6.5 mm) crochet hook, for main pieces
1 US size I (5.5 mm) crochet hook, optional for tighter tension on small pieces
Other Supplies
2 12 mm black safety eyes
Polyester fiberfill stuffing
1 Tapestry needle, for assembly and embroidery
Stitch markers
1 Scissors
Instructions
Donut Shell Top (Color B)
1-Rnd 1: Rnd 1: MR, ch 1, 6 sc into ring, pull ring closed. (6 sc)
2-Rnd 2: Rnd 2: Inc in each st around. (12 sc)
3-Rnd 3: Rnd 3: (Sc 1, inc) rep 6 times. (18 sc)
4-Rnd 4: Rnd 4: (Sc 2, inc) rep 6 times. (24 sc)
5-Rnd 5: Rnd 5: (Sc 3, inc) rep 6 times. (30 sc)
6-Rnd 6: Rnd 6: (Sc 4, inc) rep 6 times. (36 sc)
7-Rnd 7: Rnd 7: Working in BLO only, sc in each st around. (36 sc)
8-Rnd 8: Rnd 8: Sc in each st around. (36 sc)
9-Rnd 9: Rnd 9: Sc in each st around. (36 sc)
10-Rnd 10: Rnd 10: Working in FLO of Rnd 6 (the unworked front loops left from Rnd 7), join Color B and sc in each of the 36 front loops. (36 sc)
11-Rnd 11: Rnd 11: (Sc 5, inc) rep 6 times. (42 sc)
12-Rnd 12: Rnd 12: (Sc 6, inc) rep 6 times. (48 sc)
13-Rnd 13: Rnd 13: (Sc 7, inc) rep 6 times. (54 sc)
14-Rnd 14: Rnd 14: (Sc 8, inc) rep 6 times. (60 sc)
15-Rnd 15: Rnd 15: (Sc 9, inc) rep 6 times. (66 sc)
16-Rnd 16: Rnd 16: (Sc 10, inc) rep 6 times. (72 sc)
17-Fasten off, leaving a long tail of: Fasten off, leaving a long tail of approximately 18 inches for seaming.
Donut Shell Bottom (Color A)
18-Rnd 1: Rnd 1: MR, ch 1, 6 sc into ring, pull ring closed. (6 sc)
19-Rnd 2: Rnd 2: Inc in each st around. (12 sc)
20-Rnd 3: Rnd 3: (Sc 1, inc) rep 6 times. (18 sc)
21-Rnd 4: Rnd 4: (Sc 2, inc) rep 6 times. (24 sc)
22-Rnd 5: Rnd 5: (Sc 3, inc) rep 6 times. (30 sc)
23-Rnd 6: Rnd 6: (Sc 4, inc) rep 6 times. (36 sc)
24-Rnd 7: Rnd 7: Working in BLO only, sc in each st around. (36 sc)
25-Rnd 8: Rnd 8: Sc in each st around. (36 sc)
26-Rnd 9: Rnd 9: Sc in each st around. (36 sc)
27-Rnd 10: Rnd 10: Working in FLO of Rnd 6, join Color A and sc in each of the 36 front loops. (36 sc)
28-Rnd 11: Rnd 11: (Sc 5, inc) rep 6 times. (42 sc)
29-Rnd 12: Rnd 12: (Sc 6, inc) rep 6 times. (48 sc)
30-Rnd 13: Rnd 13: (Sc 7, inc) rep 6 times. (54 sc)
31-Rnd 14: Rnd 14: (Sc 8, inc) rep 6 times. (60 sc)
32-Rnd 15: Rnd 15: (Sc 9, inc) rep 6 times. (66 sc)
33-Rnd 16: Rnd 16: (Sc 10, inc) rep 6 times. (72 sc)
34-Rnd 17: Rnd 17: Working in BLO only, sc in each st around. (72 sc)
35-Rnd 18: Rnd 18: Sc in each st around. (72 sc)
36-Rnd 19: Rnd 19: Sc in each st around. (72 sc)
37-Do not fasten off: Do not fasten off. You will join the shell pieces next.
Joining the Shell Top and Bottom
38-Hold the donut shell top (Color B): Hold the donut shell top (Color B) and donut shell bottom (Color A) with wrong sides facing each other. The inner walls of both pieces should face inward and the flat surfaces should face outward. Both outer edges are at 72 stitches.
39-Begin stuffing the donut generously with fiberfill: Begin stuffing the donut generously with fiberfill before closing completely. Push stuffing firmly into the torus shape, filling the rounded tube evenly all the way around the ring. Leave the center hole clear.
40-Join round: Join round: Insert hook through the corresponding stitch on the top piece and the current stitch on the bottom piece simultaneously, sc through both layers. Continue around, sc through both layers in each paired stitch. (72 sc joining round)
41-Fasten off and weave in ends: Fasten off and weave in ends.
Head (Color B)
42-Rnd 1: Rnd 1: MR, ch 1, 6 sc into ring. (6 sc)
43-Rnd 2: Rnd 2: Inc in each st around. (12 sc)
44-Rnd 3: Rnd 3: (Sc 1, inc) rep 6 times. (18 sc)
45-Rnd 4: Rnd 4: (Sc 2, inc) rep 6 times. (24 sc)
46-Rnd 5: Rnd 5: Sc in each st around. (24 sc)
47-Rnd 6: Rnd 6: Sc in each st around. (24 sc)
48-Insert safety eyes between Rnds 3 and: Insert safety eyes between Rnds 3 and 4, spaced approximately 8 stitches apart. Secure backings firmly.
49-Rnd 7: Rnd 7: Sc in each st around. (24 sc)
50-Rnd 8: Rnd 8: (Sc 2, dec) rep 6 times. (18 sc)
51-Begin stuffing head firmly: Begin stuffing head firmly.
52-Rnd 9: Rnd 9: (Sc 1, dec) rep 6 times. (12 sc)
53-Rnd 10: Rnd 10: Dec 6 times. (6 sc)
54-Do not close completely: Do not close completely. Continue working the neck.
Neck (Color B, Continuing From Head)
55-Rnd 11: Rnd 11: Sc in each st around. (6 sc)
56-Rnd 12: Rnd 12: (Sc 1, inc) rep 3 times. (9 sc)
57-Rnd 13: Rnd 13: Sc in each st around. (9 sc)
58-Rnd 14: Rnd 14: (Sc 2, inc) rep 3 times. (12 sc)
59-Rnd 15: Rnd 15: Sc in each st around. (12 sc)
60-Fasten off, leaving a long tail for: Fasten off, leaving a long tail for attaching to shell.
Front Flippers (Make 2)
61-Flipper Top (Color B): Flipper Top (Color B): Ch 4.
62-Row 1: Row 1: Sc in 2nd ch from hook, sc in next 2 ch, turn. (3 sc)
63-Row 2: Row 2: Ch 1, inc in first st, sc 1, inc in last st, turn. (5 sc)
64-Row 3: Row 3: Ch 1, inc in first st, sc 3, inc in last st, turn. (7 sc)
65-Row 4: Row 4: Ch 1, inc in first st, sc 5, inc in last st, turn. (9 sc)
66-Row 5: Row 5: Ch 1, sc in each st across, turn. (9 sc)
67-Row 6: Row 6: Ch 1, sc in each st across, turn. (9 sc)
68-Row 7: Row 7: Ch 1, dec, sc 5, dec, turn. (7 sc)
69-Row 8: Row 8: Ch 1, dec, sc 3, dec, turn. (5 sc)
70-Row 9: Row 9: Ch 1, dec, sc 1, dec, turn. (3 sc)
71-Row 10: Row 10: Ch 1, sc 3. (3 sc)
72-Fasten off: Fasten off.
73-Flipper Bottom (Color A): Flipper Bottom (Color A): Repeat all rows as for flipper top.
74-Flipper Assembly: Flipper Assembly: Hold one Color B top and one Color A bottom with wrong sides together. Using Color A and a tapestry needle or crochet hook, sl st around the perimeter through both layers. Enclose a thin layer of fiberfill (just enough for light padding, not full stuffing). Fasten off and weave in ends.
75-Make 2 front flippers total: Make 2 front flippers total.
Back Flippers (Make 2)
76-Flipper Top (Color B): Flipper Top (Color B): Ch 3.
77-Row 1: Row 1: Sc in 2nd ch from hook, sc in next ch, turn. (2 sc)
78-Row 2: Row 2: Ch 1, inc in each st across, turn. (4 sc)
79-Row 3: Row 3: Ch 1, inc in first st, sc 2, inc in last st, turn. (6 sc)
80-Row 4: Row 4: Ch 1, sc in each st across, turn. (6 sc)
81-Row 5: Row 5: Ch 1, dec, sc 2, dec, turn. (4 sc)
82-Row 6: Row 6: Ch 1, dec, dec. (2 sc)
83-Fasten off: Fasten off.
84-Flipper Bottom (Color A): Flipper Bottom (Color A): Repeat all rows as for back flipper top.
85-Flipper Assembly: Flipper Assembly: Same as front flipper assembly. Make 2 back flippers total.
Tail (Color B)
86-Rnd 1: Rnd 1: MR, ch 1, 4 sc into ring. (4 sc)
87-Rnd 2: Rnd 2: Inc in each st around. (8 sc)
88-Rnd 3: Rnd 3: Sc in each st around. (8 sc)
89-Rnd 4: Rnd 4: (Sc 1, dec) rep 2 times, sc 2. (6 sc)
90-Rnd 5: Rnd 5: Sc in each st around. (6 sc)
91-Stuff lightly: Stuff lightly. Fasten off, leaving a tail for attachment.
Assembly Instructions
92-Identify the front of the donut shell: Step 1: Identify the front of the donut shell where the head will emerge. Using the long tail on the neck, sew the base of the neck firmly to the underside of the front of the shell ring. The head should angle upward and forward, giving the appearance that the turtle is peeking out from under the donut shell.
93-Attach the front flippers to the left: Step 2: Attach the front flippers to the left and right sides of the shell underside, angling slightly forward. Position them at approximately the 10 o’clock and 2 o’clock positions relative to the head.
94-Attach the back flippers to the lower: Step 3: Attach the back flippers to the lower left and right of the shell underside at approximately the 7 o’clock and 5 o’clock positions. Angle them slightly backward and outward.
95-Attach the tail at the 6 o’clock: Step 4: Attach the tail at the 6 o’clock position on the shell underside, centered at the back.
96-Embroider a small curved smile below the: Step 5: Embroider a small curved smile below the safety eyes using light pink or dark pink yarn. Create a gentle upward curve using three or four small stitches.
97-Embroider the sprinkles: Step 6: Embroider the sprinkles. Thread your tapestry needle with 1-inch lengths of red, orange, yellow, green, blue, and purple yarn. Place sprinkles randomly across the entire top surface of the shell, across the top of the head, and across the top of all four flippers. Each sprinkle is one short diagonal straight stitch approximately 3 to 4 mm long. Aim for 30 to 40 sprinkles on the shell and 3 to 5 per flipper and the head.
Last Step:
Please leave a rating and comment letting us know how you liked this recipe! This helps our business to thrive and continue providing free, high-quality recipes for you.- Method: crochet