Ingredients
Instructions
1-Step 1: Preparation and Cleaning Start by gathering all your materials in one spot. Clean and thoroughly dry the turntable surface and the bottom of each jar this step is crucial for strong fastener adhesion later. Any dust, oil, or moisture will prevent the fasteners from sticking properly. I learned this the hard way when my first attempt had jars sliding around because I rushed the cleaning step! While everything dries, lay out your washi tape selections and decide on a color scheme. Matching or coordinating patterns create a polished, cohesive look that makes the finished project feel intentional rather than random.
2-Step 2: Marking and Dividing the Turntable Using your ruler and pencil, measure and mark six equal triangular sections on the turntable. Think of it like slicing a pie into six equal pieces. Start by finding the center point, then mark around the outer edge at equal intervals. Connect these marks to create your sections. Apply washi tape along each pencil mark to divide the sections visually. Trim the ends neatly where the tape meets the turntable edge. This decorative touch serves both form and function it looks great and helps kids identify where each jar belongs.
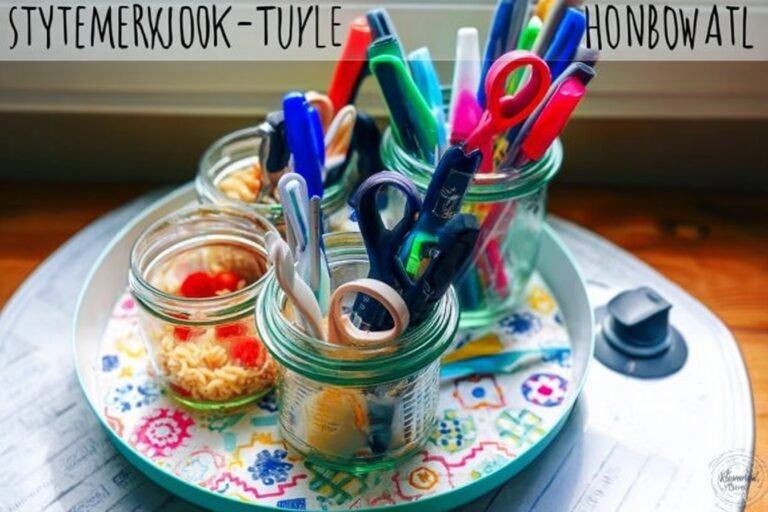
3-Step 3: Planning Your Layout Before attaching anything permanently, arrange your jars on the marked sections. Place three large jars and three small jars in alternating positions around the perimeter, with the cylindrical container or larger jar in the exact center. This step lets you visualize the final product and make any adjustments before everything is secured. Take a photo of your arrangement with your phone this helps if you need to recreate the exact placement later or if kids accidentally mix up the positions.
4-Step 4: Preparing the Jars Remove the metal bands and lids from all mason jars. Discard the flat lid portions (or save them for another project), but keep the threaded bands. These bands will be your decorative elements that add personality to each container.
5-Step 5: Decorating Jar Bands Now comes the fun part! Wrap washi tape around each metal band, applying it smoothly and trimming the ends cleanly. You can use matching tape for all bands, alternate patterns, or let each child choose their favorites. The tape-decorated bands transform ordinary mason jars into customized organizers that reflect your child’s personality. Work slowly and press firmly as you go to avoid bubbles or wrinkles. If you make a mistake, washi tape is forgiving simply peel it off and try again. Cover all seven bands completely for the most polished appearance.
6-Step 6: Attaching Fasteners Cut your fasteners to fit the bottom of each jar. You’ll need one fastener piece for each of the six outer jars and two sets for the center container (since it’s larger and may hold heavier items). Attach one side of each fastener to the jar bottoms, pressing firmly for several seconds to ensure a strong bond. Then attach the mating sides to the corresponding spots on the turntable. Take your time with alignment crooked fasteners mean crooked jars!
7-Step 7: Final Assembly Press all fastener pairs together securely, starting with the center container and working outward. Give each jar a gentle tug to confirm it’s properly attached. If any feel loose, press the fastener areas again or consider adding a second fastener for reinforcement.
8-Step 8: Filling and Positioning Fill each jar with designated supplies. The center container works well for taller items like rulers or staplers. Position your completed homework station turntable in its permanent spot on your child’s desk or homework area. For additional organization inspiration, this resource on organizing with turntables offers creative ideas for extending this concept throughout your home. Give the turntable a test spin it should rotate smoothly without any jars wobbling or threatening to fall off. If everything spins freely and stays in place, you’re ready for homework time!
Last Step:
Please leave a rating and comment letting us know how you liked this recipe! This helps our business to thrive and continue providing free, high-quality recipes for you.Notes
🔒 Fasteners secure jars for easy child access and removal.
🔄 Turntable enables quick spinning to all supplies.
🎨 Match washi tape for a cohesive look.
- Prep Time: 30-45 minutes
- Category: DIY Crafts
- Method: Assembly
Nutrition
- Serving Size: 1
- Calories: N/A
- Sugar: N/A
- Sodium: N/A
- Fat: N/A
- Saturated Fat: N/A
- Unsaturated Fat: N/A
- Trans Fat: N/A
- Carbohydrates: N/A
- Fiber: N/A
- Protein: N/A
- Cholesterol: N/A