Ingredients
– 24 chocolate sandwich cookies for rich chocolatey base
– 1/4 cup unsalted butter melted for binding cookie crumbs
– 3 bricks (24 ounces) full-fat cream cheese very soft for cheesecake base and texture
– 1 cup (8 ounces) full-fat sour cream at room temperature for tanginess and creaminess
– 3 large eggs plus 2 egg yolks at room temperature for structure and richness
– 1 and 1/2 cups granulated sugar for sweetening filling
– 1 and 1/2 teaspoons vanilla extract for enhancing flavors
– 1/4 cup fresh lemon juice for brightening flavor
– 8 ounces white chocolate chopped melted and slightly cooled for special flavor
– 3/4 cup fresh raspberries for tart contrast
– 3 tablespoons granulated sugar for sweetening raspberry puree
– 1 cup heavy cream for whipped cream base
– 1/4 cup confectioners’ sugar for sweetening cream
– 1 teaspoon vanilla for classic flavor
Instructions
1-Step 1: Prepare Your Pan and Oven First things first, preheat your oven to 325 degrees Fahrenheit. This temperature is perfect for slow, even baking that prevents cracks. Now here’s where attention to detail really matters: wrap a 9-inch springform pan very well in multiple layers of heavy-duty tin foil. I cannot stress enough how important this step is! The foil prevents water from seeping into your pan during the water bath. Water in your cheesecake equals a soggy crust, and nobody wants that. Lightly grease the pan with non-stick spray and set it aside. Some bakers like to line the bottom with parchment paper for extra insurance, which is totally optional but helpful.
2-Step 2: Create the Chocolate Cookie Crust Take your 24 chocolate sandwich cookies and crush them into fine crumbs. You can use a food processor or blender for this, or place them in a ziplock bag and crush with a rolling pin if you want a mini arm workout! Mix the cookie crumbs with your melted butter until everything is evenly coated. The mixture should hold together when you squeeze it in your hand. Press this mixture firmly into your prepared springform pan, working it slightly up the sides to form a proper crust. Use the bottom of a measuring cup or glass to get everything nice and compact. A well-pressed crust means clean slices later!
3-Step 3: Prepare the Raspberry Swirl Before making the filling, let’s get the raspberry swirl ready. Puree your fresh raspberries in a blender or food processor until completely smooth. Strain this mixture through a fine mesh sieve to remove all those seeds. Press with a spoon to extract as much juice as possible. You want a smooth puree that will create beautiful ribbons through your cheesecake. Stir in the 3 tablespoons of granulated sugar and set aside. The sugar helps the raspberry flavor pop and prevents it from being too tart.
4-Step 4: Mix the Cream Cheese Filling Here’s where having room temperature ingredients makes all the difference! If your cream cheese isn’t soft, you’ll end up with lumps that are nearly impossible to smooth out later. Beat your cream cheese and sour cream together until completely smooth. Take your time with this step, scraping down the bowl as needed. The mixture should be silky with no visible lumps. Add the eggs, egg yolks, sugar, and vanilla. Mix briefly, just until combined. Overmixing at this stage can introduce too much air, which leads to cracks during baking. We want a smooth, dense filling.
5-Step 5: Fold in the White Chocolate Gently fold in the fresh lemon juice and your melted white chocolate. The white chocolate should be melted and slightly cooled, not hot. If it’s too warm, it can cook the eggs slightly or create weird textures. Use a spatula and fold with a gentle hand. We’re being kind to this batter! Pour the filling into your prepared crust and spread it evenly with your spatula.
6-Step 6: Create the Signature Swirl Now for the fun part! Dollop your prepared raspberry swirl mixture onto the batter in several spots around the cheesecake. Take a skewer or thin knife and swirl gently through the raspberry dollops in a figure-8 pattern. Don’t overdo it! A few passes are all you need. You want distinct raspberry ribbons, not a pink cheesecake. Less is more here, friends.
7-Step 7: Bake with a Water Bath Place your foil-wrapped springform pan inside a larger roasting pan. Pour hot water into the larger pan until it reaches halfway up the sides of your springform pan. This water bath method is crucial for achieving that professional, crack-free surface. It provides gentle, even heat that protects your cheesecake from the harsh direct heat of the oven. Bake for 1 hour 30 minutes. The edges should be set but the center will still have a slight jiggle. That’s perfect! The cheesecake continues cooking as it cools.
8-Step 8: Cool Gradually When the timer goes off, turn off the oven but leave the cheesecake inside with the door closed for 45 minutes. This gradual cooling prevents the dramatic temperature change that causes cracks. Remove the cheesecake from the water bath and run a thin knife around the edge to loosen it from the pan. Cool on the counter for 30 minutes, then cover and refrigerate for at least 6 hours or overnight.
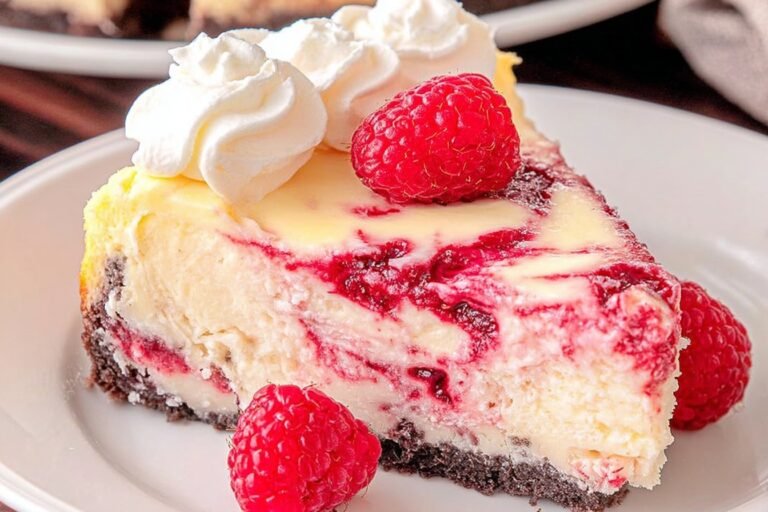
9-Step 9: Make the Whipped Cream and Serve Just before serving, whip your heavy cream with confectioners’ sugar and vanilla until semi-stiff peaks form. Don’t overwhip or you’ll end up with butter! Slice your well-chilled cheesecake with a clean, sharp knife. Wipe the knife between cuts for the cleanest slices. Top each piece with a generous dollop of fresh whipped cream and maybe a few fresh raspberries for garnish if you’re feeling fancy. According to Allrecipes, this type of cheesecake is consistently rated as a top dessert choice, and once you taste it, you’ll understand why!
Last Step:
Please leave a rating and comment letting us know how you liked this recipe! This helps our business to thrive and continue providing free, high-quality recipes for you.Notes
💧 Triple-wrap foil for leak-proof water bath—prevents soggy crust.
🧀 Room-temp dairy/eggs mix silky smooth, no lumps.
🍓 Strain raspberry puree seeds for flawless swirls.
- Prep Time: 45 minutes
- Chill: 6 hours
- Cook Time: 1 hour 30 minutes
- Category: Dessert
- Method: Baking
- Cuisine: American
- Diet: Vegetarian
Nutrition
- Serving Size: 1 slice
- Calories: 550 kcal
- Sugar: 35g
- Sodium: 400mg
- Fat: 38g
- Saturated Fat: 22g
- Unsaturated Fat: 14g
- Trans Fat: 0g
- Carbohydrates: 45g
- Fiber: 1g
- Protein: 9g
- Cholesterol: 150mg