Ingredients
– Orange yarn for creating the pumpkin body
– Pom pom maker for forming consistent pom pom shapes
– Hot glue gun for attaching stems securely
– Sharp scissors for trimming and shaping the pom pom
– Wood sticks for creating realistic stems
Instructions
1-Step One: Gather Your Crafting Supplies Start by collecting all your materials in one workspace. You’ll need orange yarn, a pom pom maker with multiple size options, a hot glue gun with glue sticks, sharp scissors, and wood chips or small sticks for stems. Having everything within arm’s reach makes the crafting process smoother and more enjoyable. If you’re working with kids, now is the time to set up a protected surface and go over safety rules, especially regarding the hot glue gun and sharp scissors.
2-Step Two: Wrap Your Pom Pom Maker Open your pom pom maker and begin wrapping orange yarn around one half of the tool. The key here is to wrap densely the more yarn you wrap, the fuller and fluffier your finished pumpkin will be. Keep wrapping until you can barely fit any more yarn, making sure to cover the entire surface evenly. Close that half and repeat the process on the other side of the pom pom maker. Consistency in your wrapping thickness ensures your pumpkin comes out round rather than lopsided. Each pom pom maker has slightly different instructions, so following your specific tool’s guidelines will help you get the best results. Some tools click open and closed, while others use different mechanisms. Take a moment to familiarize yourself with how your particular pom pom maker operates before diving in.
3-Step Three: Cut the Wrapped Yarn With your pom pom maker fully wrapped on both sides and closed, it’s time for the satisfying part cutting! Use your sharp scissors to cut along the groove on both sides of the pom pom maker. This step requires steady hands, as you want to cut through all layers of yarn cleanly. Work slowly and carefully, making sure you’re cutting in the designated groove area. The yarn pieces should separate evenly, staying in place within the tool.
4-Step Four: Secure the Center Before opening your pom pom maker, you need to tie the center securely. Cut a separate piece of yarn, about 8-10 inches long. Slide this piece between the two halves of your pom pom maker and wrap it around the center of the wrapped yarn. Pull it as tight as you possibly can this is crucial for keeping your pumpkin together. Tie a secure knot, then double-knot it for extra security. The tighter you tie, the denser and longer-lasting your pom pom pumpkin will be.
5-Step Five: Remove from the Tool Gently open your pom pom maker and release your creation. What emerges will look a bit shaggy and uneven, but don’t worry that’s completely normal! Hold your pom pom by the center tie strings and give it a gentle fluff with your fingers. You’ll start to see the pumpkin shape emerging, and the fuzzy texture will become more apparent.
6-Step Six: Shape Your Pumpkin Now comes the sculpting phase. Using your sharp scissors, begin trimming your pom pom into a smooth, round shape. Work gradually, trimming small amounts at a time and rotating the pom pom frequently. Think of it like giving your yarn pumpkin a haircut you want it round and even all over. Don’t be afraid to trim quite a bit; those cut pieces are what create the fluffy, dense look. Keep the trimmings if you can they make great stuffing for other craft projects!
7-Step Seven: Add the Pumpkin Stem Find the center tie on your pom pom pumpkin this is where you’ll attach the stem. Select a wood chip or small stick that’s proportionate to your pumpkin’s size. A tiny pumpkin needs a small stem, while larger pumpkins can handle chunkier pieces. Apply a generous dot of hot glue to one end of your wood piece, then press it firmly into the center of your pumpkin. Hold it steady for about 30 seconds while the glue sets. If you want to add extra detail, you can glue a small felt leaf next to the stem or attach a curled piece of wire or twine as a vine.
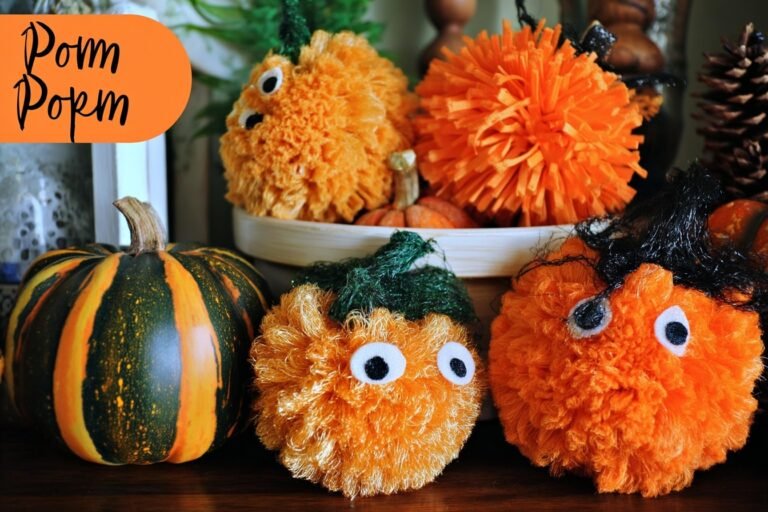
8-Step Eight: Display Your Finished Creation Your pom pom pumpkin is now complete and ready to brighten up your home! Display these charming decorations on mantels, shelves, windowsills, or anywhere that could use a touch of autumn warmth. Group several together in different sizes for a playful pumpkin patch display, or tuck individual pumpkins among your existing decor. According to crafting experts, engaging in hands-on craft projects like this one can reduce stress and boost your mood so enjoy not just the finished product but the entire creative process!
Last Step:
Please leave a rating and comment letting us know how you liked this recipe! This helps our business to thrive and continue providing free, high-quality recipes for you.Notes
📏 Use different pom pom maker sizes for varied pumpkin heights and visual interest.
🎨 Experiment with brown, green, or white yarn for acorns, leaves, or snow effects.
👶 Supervise children around hot glue; use low-temp gun for safety.
- Prep Time: 15 minutes
- Dry: 5 minutes
- Category: DIY Craft
- Method: Pom Pom Crafting
Nutrition
- Serving Size: 1 pumpkin
- Calories: N/A
- Sugar: N/A
- Sodium: N/A
- Fat: N/A
- Saturated Fat: N/A
- Unsaturated Fat: N/A
- Trans Fat: N/A
- Carbohydrates: N/A
- Fiber: N/A
- Protein: N/A
- Cholesterol: N/A