Ingredients
– 1 cup unsalted butter (16 Tbsp; 226g)
– 8 ounces semi-sweet chocolate, coarsely chopped
– 1 and 1/2 cups granulated sugar (300g)
– 1/2 cup packed light brown sugar (100g)
– 4 large eggs, at room temperature
– 2 teaspoons pure vanilla extract
– 1/2 teaspoon salt
– 1/2 cup + 3 tablespoons all-purpose flour (86g)
– 1/4 cup natural unsweetened cocoa powder (21g)
– 1/2 cup unsalted butter (8 Tbsp; 113g)
– 2 cups confectioners’ sugar (240g)
– 2 tablespoons milk (30ml)
– 1 and 1/4 teaspoons peppermint extract (adjust to taste)
– Optional: 1 drop liquid or gel green food coloring
– 1/2 cup unsalted butter (8 Tbsp; 113g)
– 1 heaping cup semi-sweet chocolate chips (around 200g)
Instructions
1-Step 1: Prepare the Brownie Base Start by melting your butter and chopped chocolate together. You have two options here: the stovetop method or the microwave method. For the stovetop, place both ingredients in a medium saucepan over medium heat, stirring frequently for about 5 minutes until completely smooth. If using the microwave, heat in 20-second increments, stirring between each burst, until the mixture is smooth and glossy. Let this chocolate butter mixture cool slightly while you prepare your pan. You want it warm enough to still be liquid but not so hot that it cooks the eggs when you add them later.
2-Step 2: Prepare Your Pan and Oven Preheat your oven to 350°F (177°C) and position the rack in the lower third of your oven. This placement helps the brownies bake evenly without over-browning the top. Line a 9×13-inch baking pan with parchment paper, making sure to leave an overhang on the sides. This overhang acts as handles, making it much easier to lift the finished brownies out of the pan for clean cutting.
3-Step 3: Mix the Brownie Batter Whisk both the granulated sugar and brown sugar into your slightly cooled chocolate mixture. The warmth helps dissolve the sugar granules, which contributes to that shiny, crackly top brownie enthusiasts love. Add the eggs one at a time, whisking thoroughly after each addition until the mixture is smooth and glossy. This gradual addition helps incorporate air and creates that desirable texture. Stir in the vanilla extract. Gently fold in the salt, flour, and cocoa powder using a spatula. The keyword here is gently – overmixing develops gluten and leads to tough, cakey brownies. Mix just until no flour streaks remain visible. The batter will be thick and fudgy.
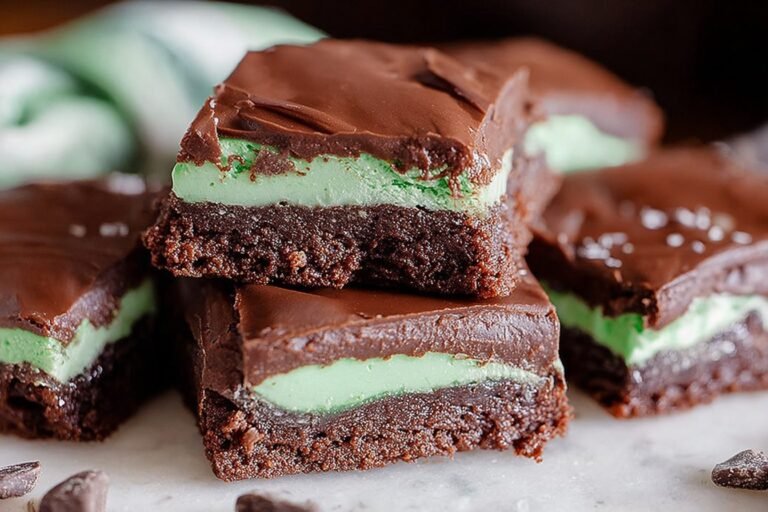
4-Step 4: Bake and Cool the Brownies Pour the batter into your prepared pan, spreading it evenly to the corners. Bake for 35-36 minutes, or until the edges start pulling away from the sides of the pan and a toothpick inserted in the center comes out with moist crumbs rather than wet batter. This is crucial: let the brownies cool completely before adding any frosting. Warm brownies will melt the mint layer, creating a mess rather than distinct layers. This cooling typically takes at least 2 hours at room temperature, or you can speed it up by placing them in the refrigerator.
5-Step 5: Prepare the Mint Frosting While the brownies cool, prepare your mint frosting. Beat the softened butter in a mixing bowl until creamy and smooth. Add the confectioners’ sugar and milk, starting the mixer on low speed to avoid a sugar cloud, then increasing to high speed for about 2 minutes until light and fluffy. Add the peppermint extract and mix well. Here’s where you need to be careful: peppermint extract is potent stuff. Start with 3/4 teaspoon, taste, and add more if desired. Too much peppermint will make your frosting taste like toothpaste rather than a delightful treat. If using green food coloring, add it now – one drop usually provides a subtle mint green color.
6-Step 6: Apply and Chill the Frosting Layer Spread the mint frosting evenly over your completely cooled brownies. An offset spatula works beautifully for this step, helping you get an even layer across the entire surface. Place the pan in the refrigerator for at least one hour. This chilling time is non-negotiable – the frosting needs to firm up to support the chocolate layer you’re about to add.
7-Step 7: Add the Chocolate Topping Melt the butter and chocolate chips together using either the stovetop or microwave method. Stir until completely smooth and let it cool for a few minutes – it should still be pourable but not hot enough to melt the frosting layer. Pour the chocolate over the chilled frosting layer, working quickly to spread it evenly across the surface. The chocolate will start setting as it hits the cold frosting, so don’t dawdle.
8-Step 8: Final Chill and Cutting Return the pan to the refrigerator for at least one hour, or until the chocolate layer is completely set. The chocolate should feel firm to the touch and not leave fingerprints when lightly pressed. When ready to serve, use the parchment overhang to lift the entire block of brownies out of the pan. Use a large, very sharp knife to cut into squares. For the cleanest cuts, make quick downward motions and wipe the knife clean between each cut. Some bakers even run the knife under hot water, dry it, then cut for extra smooth edges.
Last Step:
Please leave a rating and comment letting us know how you liked this recipe! This helps our business to thrive and continue providing free, high-quality recipes for you.Notes
🧊 Cool brownies fully—warm melts frosting layers.
💧 Peppermint extract strong; taste/add gradually.
🔪 Sharp knife + wipe yields perfect clean edges.
- Prep Time: 30 minutes
- Chilling: 4 hours
- Cook Time: 35 minutes
- Category: Dessert
- Method: Baking
- Cuisine: American
- Diet: Vegetarian
Nutrition
- Serving Size: 1 brownie
- Calories: 350 kcal
- Sugar: 35g
- Sodium: 150mg
- Fat: 22g
- Saturated Fat: 13g
- Unsaturated Fat: 8g
- Trans Fat: 0g
- Carbohydrates: 38g
- Fiber: 2g
- Protein: 4g
- Cholesterol: 80mg